图像降采样
原始脑片分辨率过高,与Allen平均脑模板的分辨率相差过大,为得到更好的配准效果,需要将原始脑片的分辨率降低。
😎我原本是在ImageJ软件上操作的,没想到用代码实现也并不复杂!
1
2
3
4
5
6
7
8
9
10
11
12
13
14
15
16
17
18
19
20
21
22
23
24
25
26
27
28
| package I.plugin;
import ij.ImagePlus;
import ij.gui.NewImage;
import ij.io.FileSaver;
import ij.process.ImageProcessor;
public class Test07 {
public static void main(String[] args) {
ImagePlus brainImage = new ImagePlus("D:/Desktop/elastix-5.1.0-win64/input/result1.tif");
ImageProcessor bp = brainImage.getProcessor();
int width = bp.getWidth();
int height = bp.getHeight();
brainImage.show();
double scale = 0.1;
int newWidth = (int)(width*scale);
int newHeight = (int)(height*scale);
ImagePlus resizedImage = NewImage.createByteImage("resizedImage", newWidth, newHeight, 0, NewImage.FILL_BLACK);
ImageProcessor rp = resizedImage.getProcessor();
rp = bp.resize(newWidth, newHeight, false);
resizedImage.setProcessor(rp);
resizedImage.show();
new FileSaver(resizedImage).saveAsTiff("D:/Desktop/elastix-5.1.0-win64/input/resized-result1.tif");
}
}
|
脑区识别
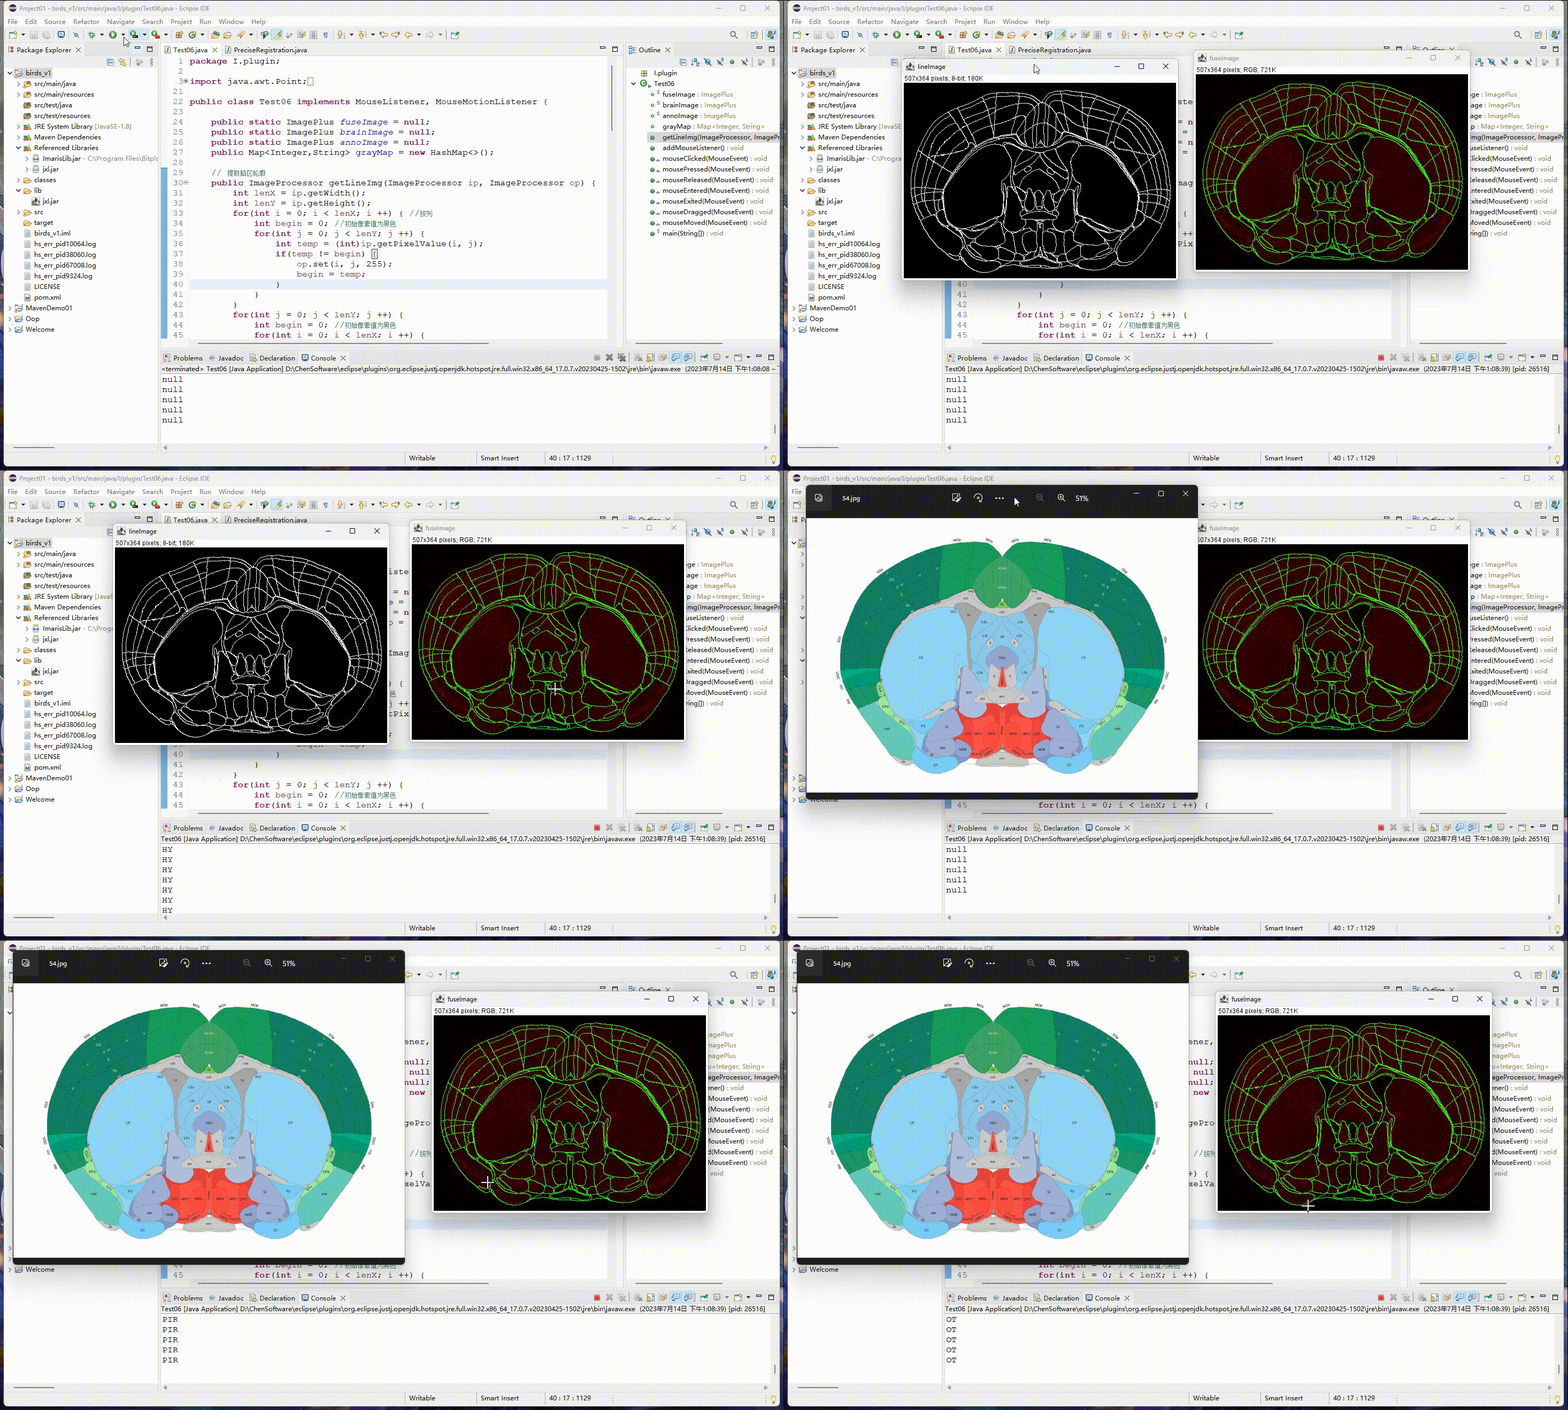
代码效果:鼠标移动到图片的哪个位置,就在Eclipse控制台输出对应的脑区,超出全脑范围则输出null。
1
2
3
4
5
6
7
8
9
10
11
12
13
14
15
16
17
18
19
20
21
22
23
24
25
26
27
28
29
30
31
32
33
34
35
36
37
38
39
40
41
42
43
44
45
46
47
48
49
50
51
52
53
54
55
56
57
58
59
60
61
62
63
64
65
66
67
68
69
70
71
72
73
74
75
76
77
78
79
80
81
82
83
84
85
86
87
88
89
90
91
92
93
94
95
96
97
98
99
100
101
102
103
104
105
106
107
108
109
110
111
112
113
114
115
116
117
118
119
120
121
122
123
124
125
126
| package I.plugin;
import java.awt.Point;
import java.awt.event.MouseEvent;
import java.awt.event.MouseListener;
import java.awt.event.MouseMotionListener;
import java.io.File;
import java.io.IOException;
import java.util.HashMap;
import java.util.Map;
import ij.ImagePlus;
import ij.ImageStack;
import ij.gui.NewImage;
import ij.io.FileSaver;
import ij.plugin.RGBStackMerge;
import ij.process.ImageProcessor;
import jxl.Cell;
import jxl.Sheet;
import jxl.Workbook;
public class Test06 implements MouseListener, MouseMotionListener {
public static ImagePlus fuseImage = null;
public static ImagePlus brainImage = null;
public static ImagePlus annoImage = null;
public Map<Integer,String> grayMap = new HashMap<>();
public ImageProcessor getLineImg(ImageProcessor ip, ImageProcessor op) {
int lenX = ip.getWidth();
int lenY = ip.getHeight();
for(int i = 0; i < lenX; i ++) {
int begin = 0;
for(int j = 0; j < lenY; j ++) {
int temp = (int)ip.getPixelValue(i, j);
if(temp != begin) {
op.set(i, j, 255);
begin = temp;
}
}
}
for(int j = 0; j < lenY; j ++) {
int begin = 0;
for(int i = 0; i < lenX; i ++) {
int temp = (int)ip.getPixelValue(i, j);
if(temp != begin) {
op.set(i, j, 255);
begin = temp;
}
}
}
return op;
}
public void addMouseListener() throws Exception, IOException {
File file = new File("D:/Desktop/rgb_name.xls");
Workbook wb = Workbook.getWorkbook(file);
Sheet sheet = wb.getSheet("test1");
for(int i = 0; i < sheet.getRows(); i ++) {
Cell[] cell = sheet.getRow(i);
grayMap.put(Integer.valueOf(cell[0].getContents()),cell[1].getContents());
}
wb.close();
fuseImage.show();
fuseImage.getCanvas().addMouseListener(this);
fuseImage.getCanvas().addMouseMotionListener(this);
}
@Override
public void mouseClicked(MouseEvent e) {}
@Override
public void mousePressed(MouseEvent e) {}
@Override
public void mouseReleased(MouseEvent e) {}
@Override
public void mouseEntered(MouseEvent e) {}
@Override
public void mouseExited(MouseEvent e) {}
@Override
public void mouseDragged(MouseEvent e) {}
@Override
public void mouseMoved(MouseEvent e) {
int currentSlice = fuseImage.getCurrentSlice();
Point point = fuseImage.getCanvas().getCursorLoc();
int val = (int)annoImage.getImageStack().getVoxel(point.x, point.y, currentSlice-1);
System.out.println(grayMap.get(val));
}
public static void main(String[] args) throws IOException, Exception {
brainImage = new ImagePlus("D:\\Desktop\\elastix-5.1.0-win64\\input\\result1-1.tif");
ImageStack brainStack = brainImage.getStack();
annoImage = new ImagePlus("D:\\Desktop\\elastix-5.1.0-win64\\result\\result.tif");
ImageProcessor ap = annoImage.getProcessor();
int width = ap.getWidth();
int height = ap.getHeight();
ImagePlus lineImage = NewImage.createByteImage("lineImage", width, height, 0, NewImage.FILL_BLACK);
ImageStack lineStack = lineImage.getStack();
ImageProcessor lp = lineImage.getProcessor();
ImageProcessor op = new Test06().getLineImg(ap, lp);
lineImage.setProcessor(op);
lineImage.show();
fuseImage = NewImage.createByteImage("fuseImage", width, height, 0, NewImage.FILL_BLACK);
ImageStack fuseStack = RGBStackMerge.mergeStacks(brainStack, lineStack, null, true);
fuseImage.setStack(fuseStack);
new FileSaver(fuseImage).saveAsTiff("D:/Desktop/fuseImage-1.tif");
new Test06().addMouseListener();
}
}
|
操作演示

注意事项
- Eclipse中导入jxl.jar包,具体方法可参考博客,需要注意jxl.jar包只能处理.xls文件
- 脑片降低分辨率后统计出的各个脑区的细胞数目,需要与人工计数的结果进行对比,如果差别不大,则后续采用降低分辨率的脑片进行配准。
- 配准后的图像使用
Imaris软件计数,具体操作步骤见文章Imairs细胞计数教程
参考文章


